 |
| Firewatch/Olly Moss inspired landscape. |
03/10/2012
T-Rex Revisions
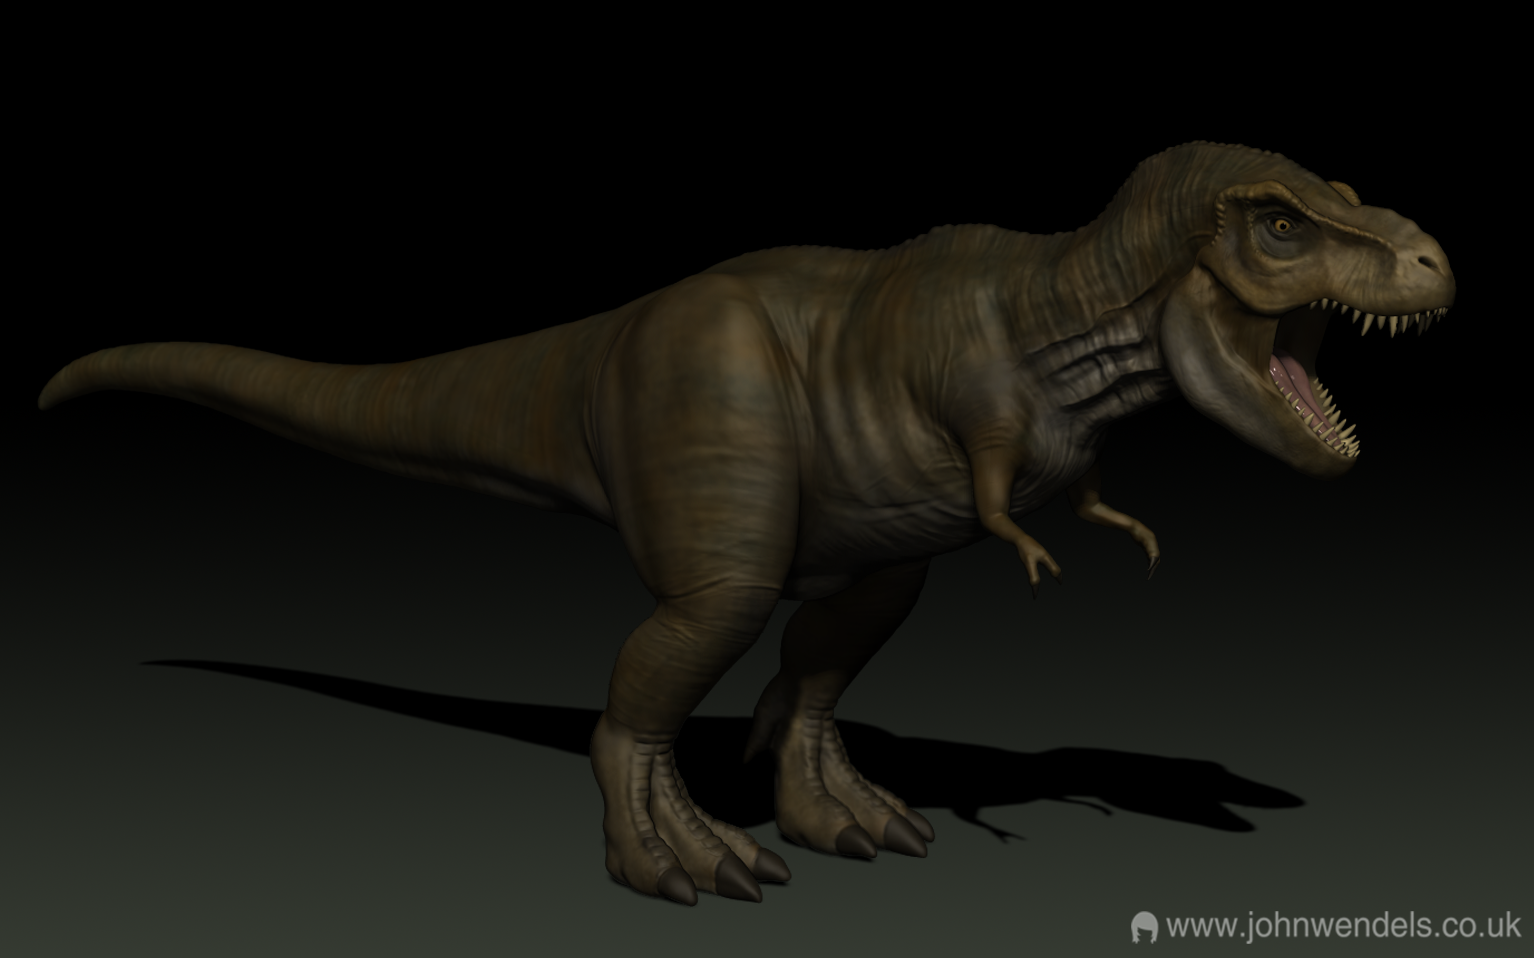
Worked further on the T-Rex sculpt and I'm now a lot happier with it. This is possibly the most detailed sculpt I've created, with all steps performed entirely within Zbrush with the exception of retopology which was done in 3ds Max. Although I'm happy with the detail I still feel I could push it a lot further, especially with the texture.


27/09/2012
T-Rex - Polypainting
Had some fun giving the T-Rex a basic polypaint in Zbrush.
For what is possibly the first attempt I've ever done at polypainting, I'm pretty happy with it so far!
There's still a lot of detail I want to bring out so I look forward to seeing how far I can push the painting tools.

I also made slight adjustments to the pose and proportions of the head, which I also plan to do for the hands and possibly the legs.
For what is possibly the first attempt I've ever done at polypainting, I'm pretty happy with it so far!
There's still a lot of detail I want to bring out so I look forward to seeing how far I can push the painting tools.
I also made slight adjustments to the pose and proportions of the head, which I also plan to do for the hands and possibly the legs.
26/09/2012
T-Rex Update
Wow, time has flown since my last update.
Decided to give this guy some love and spent a few hours overhauling the proportions and main forms, and adding a lot more detail. Overall I'm much happier with the current sculpt, although there are still a lot of things I want to refine and improve.

I will probably give this guy a rough poly paint coat while I continue to add details, hopefully the next update won't take me so long!
18/07/2012
T-Rex Sculpt
Here is a quick render of a new sculpt I started a couple of days ago.
The mesh was created using Zspheres so it's pretty messy in some places, I plan to retopologise it before I sculpt in any more detail.

The mesh was created using Zspheres so it's pretty messy in some places, I plan to retopologise it before I sculpt in any more detail.

24/04/2012
Mutant Shark - Zbrush Sketch
29/11/2011
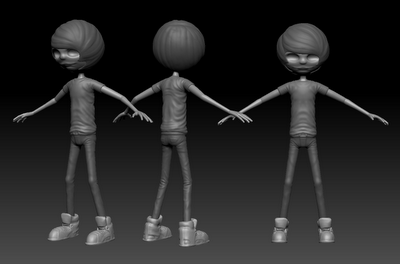
Stylised self portrait
Here's a quick look at a stylised self portrait character I am making (click to enlarge)

03/07/2011
Stylised Self Portrait Character Update
The character is starting to come to life now, and I'm enjoying getting lost in the creative sculpting process again. Blogging the creation process helps to see the progress and motivates me to continue working on the character. The shoes are the main thing left to complete, but the other elements will probably have finer details added or changes made to them.


02/07/2011
3D Character in Progress
I have been struggling to find much motivation recently, I think I burned myself out towards the end of my University course, and the lack of success in finding a job hasn't really helped much!
I recently invested in a completely new computer, so I have been eager to test its capability, but with no real project being worked on I've not really taken advantage yet.
I have made several attempts to start adding to my portfolio but have been finding it hard to return to a piece after the initial session. I think this is down to a lack of interest in the things I have been creating, so I am trying to focus on learning new technical skills and improve on my modelling ability and overall speed.
Previously, realism has been always been major focus of my work, but today I started work on a 3d character with a more stylised appearance. So far this has been an exercise in learning to use Zspheres to create the basis of a model and sculpting folds and creases in clothing. The intention of this character is to be a stylised representation of myself, but I have made it so the base of the character could be reused for future characters.
At this point I am happy with the base and fairly happy with the t-shirt and jeans. The head and shoes are yet to be done and possible accessories still to be added.

Obviously this is still a work in progress but I look forward to seeing it complete.
Hopefully I will continue work on this over the next few days but if nothing else, I've opened Zbrush, picked up my wacom and done some 3D work, which is a start at least!
31/05/2011
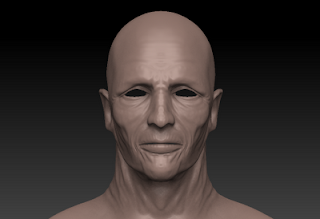
Work in progress sculpt
I am currently working on sculpting an old man's face, trying to work quickly while still achieving a good level of detail. I am unsure where this will end up and whether I will turn this into a full character, but at the moment it is purely for the practice of creating wrinkles, folds and fine detail in the skin.

25/05/2011
12/05/2011
Business Card Design.
As part of my Employability Pack I have been requested to create a brand for myself and include this on documents. Here is a business card design I put together using my logo and branding.
Front

I wanted to keep the front of the card as simple and clean as possible, with just my logo design. I chose this design as I feel it effectively simplifies my physical appearance into one element, which I think is important for making the business card memorable and unique, with a personal touch. I also incorporated a wireframe element into the logo to suggest the 3D element of my work.
Back (Details)

I went for a smarter look for the back, carrying through the grey element from the front and with a subtle repeat of the logo. I added a 3D rendition of my name while attempting to keep a balance between creative and professional.
I'm aware I probably refer to the front and back wrongly but I like to think that the design/identity element would be presented first, much like your face is the first thing presented to people in real life.
I am interested to see how these look printed professionally, so I will be ordering some through Vistaprint.
09/05/2011
Crowe - Diffuse Texture Completed
Crowe is now fully textured, complete with his weapons. I am very happy with how the texture has turned out and when looking back at the initial concept I drew up, I feel it is a very good representation. There are some minor differences however. For example, we decided due to a cut in the storyboard Crowe no longer needed the large knife on his leg, which avoided issues where it might intersect with other areas when rigging and animating. The hood is perhaps not as effective as I had hoped, as Crowe's face is quite clearly visible and I would have liked his eyes to have been shadowed, however this may be something we can add through the use of good lighting. His hair may be retouched as I am still unsure about it, but as it is only visible in one scene this is not too much of a pressing issue.

Crowe concept art:

Crowe concept art:
Crowe – Yet another texture update
Another diffuse texture update, this time with subtle material texture detail added as well as a dirt layer to all elements of the texture, including the face. The shoulders are perhaps still looking a little too smooth and plain, so I will experiment with adding some subtle detail to reduce this effect.


Comments and feedback greatly appreciated as always :)
Comments and feedback greatly appreciated as always :)
08/05/2011
Crowe – Eye Texture

The eye texture as it stands at the moment, created using a 'double-decking' technique, where one sphere is slightly indented to create the iris and the pupil, with another slightly larger, almost transparent but high specularity sphere encompassing it to act as the cornea. This is very effective for replicating the eyes at angles.

Crowe – Diffuse Texture Update – WIP
A further update to the face diffuse texture. I have been concentrating primarily on the lips, facial hair, and working some blemishes and subtle pores into the skin. The eyes are still untouched at this stage.

Crowe – Diffuse Texture – WIP
Began adding detail to the diffuse texture today as we will soon be close to the rendering stages and this needs to be completed.
This is how the diffuse texture is looking on the face at the moment, though it will likely go through a lot of changes before it is completed. For example, I am looking to add an element of dirt/griminess which will also carry through to his clothing to make him fit his environment more convincingly.


Any feedback and suggestions will be appreciated :)
06/05/2011


01/05/2011
Crowe – Rigging
With the rig very close to completion (with the exception of the hood and weapons) I decided to create a few renders to show the deformation of the mesh.
Some overlayed elements of the mesh proved rather difficult, such as the shoulder leather, the belts and the leg armour. To overcome this I hid all overlayed elements and rigged the main mesh, I then unhid the elements one by one and rigged them as well as possible.
Rigging is not necessarily my strongest skill, and this has not been without it's challenges but I have given it my best attempt and I'm rather pleased with the results.
Here are some of the poses I was using throughout the rigging process as a means of easily seeing how well each area was deforming.


At the moment Crowe has a basic temporary diffuse texture applied, but this will be replaced with a more detailed one at a later date. At this stage however, we are running very late so our main priority is to get started on the animation.
24/04/2011
Animation, Texture, Tracking Test
Here is an update of the snake in its current state. I feel this scene is nearing completion now. The end of the video is clearly not complete and the track becomes extremely unusable. These frames were meant to be omitted from the render but as a test I don't feel this is too important. I think the final shot will end with the snake facing/approaching the camera, so I may alter the timing on the animation to better fit within the areas of effective tracking.
22/04/2011
Texturing - Diffuse Texture
Using the ambient occlusion as a guide, I painted a diffuse texture in Photoshop. I experimented with different ideas in order to find the look I wanted. Here are some of the different textures I created.


The final texture is the one I have chosen as I feel it is the most effective, it is nice and simple and fairly convincing as a snake texture. Here is the unwrapped texture painted in photoshop:


The final texture is the one I have chosen as I feel it is the most effective, it is nice and simple and fairly convincing as a snake texture. Here is the unwrapped texture painted in photoshop:

21/04/2011
Texturing - Projecting High poly onto Normal and Ambient Occlusion Maps
After unwrapping the snake model, I used render to texture to project the High Poly detail onto a normal map and also created an ambient occlusion map to add subtle depth to the diffuse texture when it has been created.
This is the low poly geometry with the normal map applied.
 There are slight problems where the maps haven't baked properly however these will be painted out and less visible once the diffuse texture is applied.
This is the normal map generated through the render to texture process:

This is the ambient occlusion map created through the projection process, this will be used as a guide to paint the diffuse texture in photoshop.

With the ambient occlusion map applied, the model appears to have a little more depth in the face.

This is the low poly geometry with the normal map applied.

This is the normal map generated through the render to texture process:

This is the ambient occlusion map created through the projection process, this will be used as a guide to paint the diffuse texture in photoshop.

With the ambient occlusion map applied, the model appears to have a little more depth in the face.

20/04/2011
Main Character “Crowe” – Texture Baking
First, there has been a small update in that the main character has now been named 'Crowe'. His full name and background are still a mystery for the purposes of the story, but we felt he needed a name other than 'The Protagonist' or 'Main Character'!
I have spent the past few days baking texture maps for Crowe, which has proved a lot more difficult and fiddly than I found it before. I had problems with the high poly meshes from zbrush being too decimated or too thin, so shadows and backfacing polygons were showing up and causing problems all over the mesh. I also tried using xNormals as I have heard a lot of good things about it, and I especially liked the idea of being able to project the full quality of the high poly sculpt into the normal and ambient occlusion maps, however this presented errors.
I took steps to resolve the errors in both methods so I could use them both and compare the results. However, the problems with the 3DS Max method I am accustomed to were resolved first, so I decided this was the best option to save wasting any more time.
This stage of the project has been extremely tedious and stressful, but I am happy to say I now have usable normal and ambient occlusion maps. I will use the ambient occlusion map as an overlay on the diffuse texture.
Here you can see the effect of the normal and ambient occlusion maps on the white coloured model.
19/04/2011
Main Character - Retopology
Here are some wireframes of the finished low poly mesh.


The polycount stands at little under 18,500 triangles not including the eyes. The eyes have rather high poly counts at the moment so this will likely be reduced.
The polycount stands at little under 18,500 triangles not including the eyes. The eyes have rather high poly counts at the moment so this will likely be reduced.
18/04/2011
Main Character - Progress Update
There has been a lack of posts on my part since the completion of my high polygon sculpt. I have been spending time retopologising and unwrapping the character to prepare for texturing. With these stages complete I am now ready to create texture maps and rig the character for animation.
This stage of the process seems to be taking a lot longer than I would have liked, mainly as I have been taking extra care to research and test different techniques to ensure the best results possible, particularly concerning the topology and managing the separate elements of the character when baking the textures.
My aim now is to get the character rigged as soon as possible so the basic animations can be blocked out. This can be done before the textures are finished but I would at least like to have the ambient occlusion and normal maps applied to the character before the animation stage.
I will post updates shortly showing the low res character's topology and the character with the normal map and possibly basic diffuse textures applied.
04/04/2011
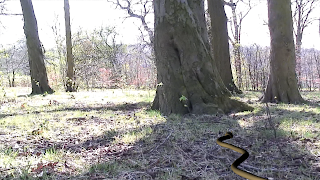
Snake Animation Shot Test
I created a simple animation to test both my animation method and proposed shots for the footage.
At this stage I am happy with the results, however the snake looks very small and thin in comparison to the tree. If the snake was bigger I would need to use smaller bones and increase the amount to ensure the snake followed the path effectively without any extreme bends in the mesh.
At this stage I am happy with the results, however the snake looks very small and thin in comparison to the tree. If the snake was bigger I would need to use smaller bones and increase the amount to ensure the snake followed the path effectively without any extreme bends in the mesh.
30/03/2011
Main Character - Turntable Animation
Here is a turntable animation showing the finished high poly character model of the main character.
As always, comments and feedback much appreciated,
Thanks, John.
As always, comments and feedback much appreciated,
Thanks, John.
Main Character - High Poly Sculpt Completed
Today marked the completion of the character model for the main character for our animated short. This should have probably been completed earlier however I feel the extra time spent on this stage has benefited the quality of the model and will benefit the quality of the whole piece as a result. I feel the character is a good representation of the design concept and far exceeds my expectations.

The most challenging element of the model was the head and face, which required a lot of working and reworking before achieving results I was happy with. I have learned a lot from this process and it has inspired me to spend more time making anatomical studies both in traditional drawing tools and in zbrush.
I added very fine detail to the face such as pores and slight blemishes and imperfections. I believe imperfections go hand in hand with realism and he still looks too 'perfect', so it is possible I may go back and add more slightly less subtle imperfections to give him a more realistic human face.

At this stage I consider this to be finished, and any adjustments I may make will be very slight. My next step will be to create his weapons before beginning on the retopology of the character.
All comments and feedback appreciated,
Thanks, John :)
The most challenging element of the model was the head and face, which required a lot of working and reworking before achieving results I was happy with. I have learned a lot from this process and it has inspired me to spend more time making anatomical studies both in traditional drawing tools and in zbrush.
I added very fine detail to the face such as pores and slight blemishes and imperfections. I believe imperfections go hand in hand with realism and he still looks too 'perfect', so it is possible I may go back and add more slightly less subtle imperfections to give him a more realistic human face.
At this stage I consider this to be finished, and any adjustments I may make will be very slight. My next step will be to create his weapons before beginning on the retopology of the character.
All comments and feedback appreciated,
Thanks, John :)
26/03/2011
Main Character - Almost Complete
I have assembled all parts of the high poly model and made slight adjustments so they fit together well. The face has been altered slightly and lips have been added. Overall I am very please with how this is coming along and how the model compares to the character concept design. The trousers are looking quite plain in comparison to the top, and the silhouette of the hips area is looking a little wide due to the leather leg guards, so these may need some adjusting. My next step will be completing the eyes, which would leave only the weapons and the dagger sheath on the leg to be completed. I am hoping to get this done fairly quickly so I can move on to retopologising, texturing and rigging the model.

23/03/2011
Main Character - Head Update
Added ears and begun roughing out the general look and feel of the hood. From the side view the ears aren't looking quite as good as I had hoped, as they are a separate subtool to the head.

22/03/2011
Shadow Catching
In order to realistically catch and create shadows I created a ground plane and a proxy tree with a Shadow/Matte material applied. This will allow me to use them both as a guide for the animation and to receive shadows and create realistic ambient shadows. I initially thought I would have to mask the tree out manually in post production, however after creating the spline and setting up the animation path around the tree I found the Shadow/Matte material does this automatically. The downside of this is that the tree model I am using will have to be built to match the tree in the footage exactly if the snake is to look like it is actually wrapping around the real tree.


The lights and shadows used in these screenshots are not those to be used in the final sequence, but clearly illustrate the effectiveness of the Matte/Shadow material.

21/03/2011
High Resolution Snake
I have completed the high detail snake model, which will be used to project detail onto the lower poly version in the form of texture maps. Hopefully I can transfer enough of the scales detail to the ambient occlusion map to allow me to paint a diffuse map which is consistent with the scale pattern. However from my experience some of the high level detail is likely to be lost in the decimation process which is necessary in order to get the model stable in 3ds max.


Tracking footage
After capturing my desired shot several times, I tracked them using Syntheyes in order to see which would be the most effective.
After deciding on my shot, I exported the track script to 3DS Max and merged my rigged snake model. I set the image sequence of my chosen shot as the viewport background and used the tracking markers to position and scale the snake.

After deciding on my shot, I exported the track script to 3DS Max and merged my rigged snake model. I set the image sequence of my chosen shot as the viewport background and used the tracking markers to position and scale the snake.

I will now concentrate on replicating the floor plane and the tree in 3d in order to catch shadows and add realism to the scene. Modelling the tree will also prove useful as a guide for effectively animating the snake so it appears to be around the tree.
19/03/2011
Main Character – Head Sculpt WIP
With the clothing, hands and base sculpt nearing completion I have begun work on the head and face. So far I have concentrated on plotting the main forms of the face and working on the overall composition, as well as adding some detail into the nose. These may be adjusted to alter the main character's appearance at a later stage.

Subscribe to:
Comments (Atom)