Here is a turntable animation showing the finished high poly character model of the main character.
As always, comments and feedback much appreciated,
Thanks, John.
30/03/2011
Main Character - High Poly Sculpt Completed
Today marked the completion of the character model for the main character for our animated short. This should have probably been completed earlier however I feel the extra time spent on this stage has benefited the quality of the model and will benefit the quality of the whole piece as a result. I feel the character is a good representation of the design concept and far exceeds my expectations.

The most challenging element of the model was the head and face, which required a lot of working and reworking before achieving results I was happy with. I have learned a lot from this process and it has inspired me to spend more time making anatomical studies both in traditional drawing tools and in zbrush.
I added very fine detail to the face such as pores and slight blemishes and imperfections. I believe imperfections go hand in hand with realism and he still looks too 'perfect', so it is possible I may go back and add more slightly less subtle imperfections to give him a more realistic human face.

At this stage I consider this to be finished, and any adjustments I may make will be very slight. My next step will be to create his weapons before beginning on the retopology of the character.
All comments and feedback appreciated,
Thanks, John :)
The most challenging element of the model was the head and face, which required a lot of working and reworking before achieving results I was happy with. I have learned a lot from this process and it has inspired me to spend more time making anatomical studies both in traditional drawing tools and in zbrush.
I added very fine detail to the face such as pores and slight blemishes and imperfections. I believe imperfections go hand in hand with realism and he still looks too 'perfect', so it is possible I may go back and add more slightly less subtle imperfections to give him a more realistic human face.
At this stage I consider this to be finished, and any adjustments I may make will be very slight. My next step will be to create his weapons before beginning on the retopology of the character.
All comments and feedback appreciated,
Thanks, John :)
26/03/2011
Main Character - Almost Complete
I have assembled all parts of the high poly model and made slight adjustments so they fit together well. The face has been altered slightly and lips have been added. Overall I am very please with how this is coming along and how the model compares to the character concept design. The trousers are looking quite plain in comparison to the top, and the silhouette of the hips area is looking a little wide due to the leather leg guards, so these may need some adjusting. My next step will be completing the eyes, which would leave only the weapons and the dagger sheath on the leg to be completed. I am hoping to get this done fairly quickly so I can move on to retopologising, texturing and rigging the model.

23/03/2011
Main Character - Head Update
Added ears and begun roughing out the general look and feel of the hood. From the side view the ears aren't looking quite as good as I had hoped, as they are a separate subtool to the head.

22/03/2011
Shadow Catching
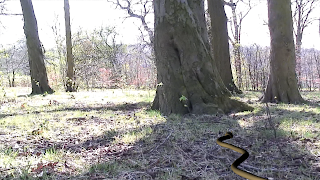
In order to realistically catch and create shadows I created a ground plane and a proxy tree with a Shadow/Matte material applied. This will allow me to use them both as a guide for the animation and to receive shadows and create realistic ambient shadows. I initially thought I would have to mask the tree out manually in post production, however after creating the spline and setting up the animation path around the tree I found the Shadow/Matte material does this automatically. The downside of this is that the tree model I am using will have to be built to match the tree in the footage exactly if the snake is to look like it is actually wrapping around the real tree.


The lights and shadows used in these screenshots are not those to be used in the final sequence, but clearly illustrate the effectiveness of the Matte/Shadow material.

21/03/2011
High Resolution Snake
I have completed the high detail snake model, which will be used to project detail onto the lower poly version in the form of texture maps. Hopefully I can transfer enough of the scales detail to the ambient occlusion map to allow me to paint a diffuse map which is consistent with the scale pattern. However from my experience some of the high level detail is likely to be lost in the decimation process which is necessary in order to get the model stable in 3ds max.


Tracking footage
After capturing my desired shot several times, I tracked them using Syntheyes in order to see which would be the most effective.
After deciding on my shot, I exported the track script to 3DS Max and merged my rigged snake model. I set the image sequence of my chosen shot as the viewport background and used the tracking markers to position and scale the snake.

After deciding on my shot, I exported the track script to 3DS Max and merged my rigged snake model. I set the image sequence of my chosen shot as the viewport background and used the tracking markers to position and scale the snake.

I will now concentrate on replicating the floor plane and the tree in 3d in order to catch shadows and add realism to the scene. Modelling the tree will also prove useful as a guide for effectively animating the snake so it appears to be around the tree.
19/03/2011
Main Character – Head Sculpt WIP
With the clothing, hands and base sculpt nearing completion I have begun work on the head and face. So far I have concentrated on plotting the main forms of the face and working on the overall composition, as well as adding some detail into the nose. These may be adjusted to alter the main character's appearance at a later stage.

15/03/2011
Main Character - WIP Update - Accessories
Main character updated with belts and throwing knife holders.

Spline IK Animation Test
After playing around with the Spline IK method, I also found the progress along the path could be edited and animated to determine where the snake will be at set points in the sequence, which would prove very useful. Another benefit I have found with this method is that the actual vertices of the spline can be edited and animated, and no stretching will occur in the model's mesh, the path will simply be changed.


I created a simple test animation to see how effective this method of animation will be.
This has proven this method is probably the most effective for the results I intend to achieve. The only downside to this method is I am unsure how to rig the snake so I have control of the head. This is something I will look into.
Rigging with Bones
After testing the CAT rig I decided this was not the most practical method of rigging my snake.
I researched other methods and found I could rig the snake with basic bones and use a custom spline to drive the animation, almost like a train track. This sounded very appealing so I quickly created an IK bone chain to fit the snake, quickly skinned the snake to the bones and created a spline on which the bones would travel.


I will likely use this method for my final sequence, as it seems it will allow a larger level of customisation and control than keyframing, and any changes to the path will be visible instantly
I researched other methods and found I could rig the snake with basic bones and use a custom spline to drive the animation, almost like a train track. This sounded very appealing so I quickly created an IK bone chain to fit the snake, quickly skinned the snake to the bones and created a spline on which the bones would travel.


As you can see, by default the bones only affected the part of the mesh they were placed, suggesting the envelopes were too small and the bone count was not high enough. I experimented with editing envelopes and found that making the bones cover a greater portion of the model, the bends and coils became a lot smoother.


I will likely use this method for my final sequence, as it seems it will allow a larger level of customisation and control than keyframing, and any changes to the path will be visible instantly
13/03/2011
Final Year Group Project Blog
I am currently working as part of a group to create a short animation. Within the group my responsibilities include character design, modelling, texturing, rigging and animation.
You can follow our progress on our blog.
You can follow our progress on our blog.
Snake Rigging Test
Before moving any further with my model I have decided to conduct a series of tests to determine the best way to rig and animate the low resolution model.
My preferred method of rigging would be through the use of the CAT system within 3DS Max. I created a custom rig preset and quickly skinned the model to gain some idea of how easy and effective the process would be. I then experimented with posing the snake to test the rig and skin.


The results of this test showed the bends looked square and too sharp. I was able to reduce this effect and improve most of the deformation by editing the skinning envelopes. Overall it looks a lot better but there are still some problem areas I was unable to fix.

While this may look a lot better, this is only a static pose and I have yet to test the way the rig animates. It's likely more bones will be needed to effectively recreate the fluid movement of a real snake. I also need to change the placement of the rig's 'neck' as it currently controls the front third of the snake and doesn't allow realistic movement or deformation of the head and affected body area.
High Resolution Snake Work In Progress
Just an update to show high detail snake in its current state. Following feedback from my idea pitch I have decided to scrap the horror theme and instead I will focus on trying to create a nice, realistic animation of a new snake species. I intend to give the snake a camouflage ability so a lot of tests will be carried out to determine how possible this would be and how effectively it can be done.
I have refined the shape of the head to be more defined and look more like that of a horned viper. As the horror elements have been removed from my idea, the mouth will no longer need to be wide open and visible to the camera. I have made adjustments to the model so the mouth is closed, which has helped as before I had no way of seeing how well the bottom of the mouth lined up with the top.

There is still a little high frequency detail to be added and refined onto the head, and I intend to place a repeating scale pattern along the entire length of the body.
07/03/2011
Main Character – Hi Poly WIP Update – Clothing
Since the last update I have added leather arm braces to complete the underlying symmetrical design of the character. With the basic symmetrical forms laid down, I have begun adding folds and creases to the clothing elements to breathe more and realism into the model. The top has also been adjusted to create the asymmetrical hemline present in the concept artwork.

Next I will focus on adding the 'accessories', such as the belt and the weapon holders.
At this stage the head is yet to be created and the hands are still incomplete.
Next I will focus on adding the 'accessories', such as the belt and the weapon holders.
At this stage the head is yet to be created and the hands are still incomplete.
03/03/2011
Main Character – Basic Clothing Elements
The first set of work in progress renders of the high detail sculpt of the lead character's body.
Basic clothing elements have been created using extractions from the base model to mark the key features of the character's design. So far the basic symmetrical forms have been plotted, with further detailing and asymmetrical features to be added.

The first set of work in progress renders of the high detail sculpt of the lead character's body. Basic symmetrical forms and features have been plotted with finer details and asymmetry still to be xadded.
Basic clothing elements have been created using extractions from the base model to mark the key features of the character's design. So far the basic symmetrical forms have been plotted, with further detailing and asymmetrical features to be added.
The first set of work in progress renders of the high detail sculpt of the lead character's body. Basic symmetrical forms and features have been plotted with finer details and asymmetry still to be xadded.
01/03/2011
Main Character - Base Sculpt
After the rough base model was created in 3Ds Max it was taken into zbrush so the basic underlying forms could be sculpted and proportions altered, allowing clothing to be created on top with deforming the underlying structure of the model.
Some subtle muscle definition and bones were sculpted to mark out the basic features, to help with placing the clothing elements and later the edge loops in the topology.

Parts of this will be masked and extracted to create basic clothing elements as separate subtools, which will then allow them to be individually sculpted to add detail .
Some subtle muscle definition and bones were sculpted to mark out the basic features, to help with placing the clothing elements and later the edge loops in the topology.
Parts of this will be masked and extracted to create basic clothing elements as separate subtools, which will then allow them to be individually sculpted to add detail .
Subscribe to:
Posts (Atom)